Are you struggling to manage your email?
Trust me, I know exactly how you feel!
Email overload is a real thing. The average office worker receives 121 emails a day, which is crazy!
I may not work in an office, but I still have a hard time staying on top of my inbox.
Just last year, the personal email address that I currently have had reached the point where I wanted to abandon it. There were thousands upon thousands of emails and I wasn’t quite sure how to manage it.
To say it was overwhelming is an understatement.
Since abandoning that address and creating a new one was pretty much out of the question, I set out on a mission. I was determined to tame my email address once and for all!
In this post, I will show you 4 tips that will help you manage email, no matter how many unread messages you might have.
Step #1 – Sign Up for Unroll.ME
Unroll.me is a free service that allows you to easily unsubscribe from any email list that you no longer want to be subscribed to.
You know how sometimes when you choose to unsubscribe from a big-name corporation, you will still continue to receive their emails for a couple of weeks? Well, I’ve never had that happen since using unroll.me. The minute I choose to unsubscribe from a list, I NEVER hear from them again.
And there’s more! All the lists you do want to stay on can be added to one single email, called your “Rollup”. So instead of having to sift through 10 different newsletters every day, you only have to open one email. If there’s something you want to read more on, all you have to do is click on it and it will take you directly to that specific newsletter.
Talk about an easy way to manage email!
Are you ready to get started? Let’s break it down step by step!
– Type unroll.me in your browser’s address bar
First of all, you need to sign up for a free account with unroll.me.
After you choose your email service provider, it will be given access to your email account. Some email providers may ask for confirmation that it’s okay to allow access.
– Once unroll.me has rounded up all of your subscriptions, you’ll be able to see them all in a row.
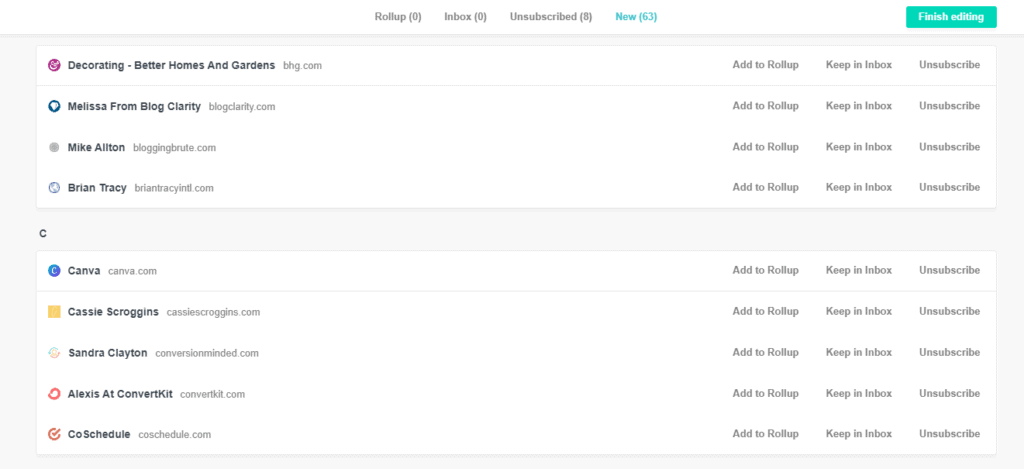
– Next, simply go through the list and decide on 1 of 3 actions:
- Unsubscribe
- Keep in Inbox
- Add to Rollup
The first time I did this with my personal email address, I had over 190 subscriptions! That was a big part of why my entire inbox had close to 6,000 emails.
If you haven’t opened an email from someone in more than 3 months, unsubscribe!
And if you want to keep receiving newsletters from a specific company, but you don’t open them all the time, I suggest adding them to your Rollup.
There’s no limit to how many can be added. My Rollup currently has 35! Businesses like Ashley Home Store, Chrysler, Home Depot, Netflix, Wayfair, Walmart, Ticket Master, etc.
One last thing to note – you don’t have to use the Rollup service. You can simply sign up for Unroll.ME just to easily subscribe from all the lists you no longer want to be a part of.
Step #2 – Declare Email Bankruptcy if You Must
To truly be able to manage email, you should start with a clean slate.
If you have thousands of unread emails, you probably think this step is impossible.
But I can assure you that it is completely possible!
So what is email bankruptcy? In a nutshell, it’s archiving (or deleting) every email that you have, no matter how many.
This used to be an insurmountable task for those on mobile devices because you could only select the emails on any given page. That meant sifting through every. single. page.
But most email service providers have made it easy to select all. You just have to learn how to do it!
I quickly processed over 2500 emails in my Promotions tab and over 3000 emails in my Primary tab. Where I once wanted to abandon my account, I was now able to manage email like I never had before!
Are you curious to know how I deleted that many emails at once? I’ll share some screenshots from my Gmail account and show you how I did it.
Don’t get discouraged if you have a different email service provider!
I will share links to as many resources as I can find. We’ll declare email bankruptcy together!
– First, click on the box in the upper left-hand corner of your inbox.

– After you’ve selected all of the emails on the current page, a prompt will appear at the top of the screen that gives you the option to select all conversations, however many that may be.
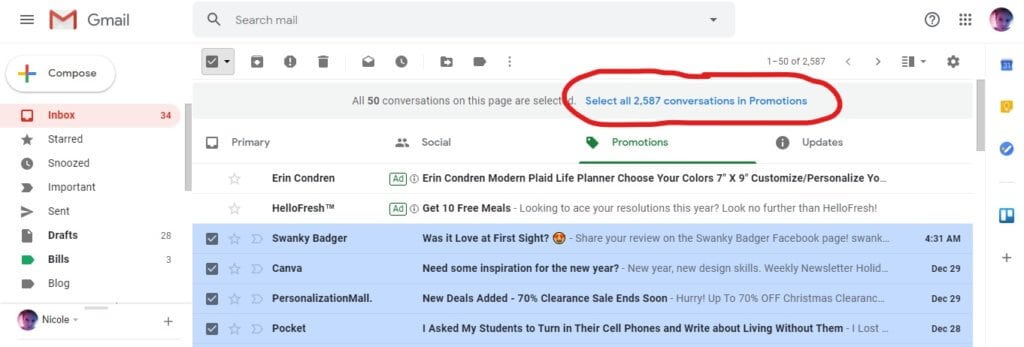
– Once you select all the emails in your entire inbox, you can choose to do what you want:
- If this is your work or school email address, I suggest marking them all as read and moving them to a “Processed Label”. This will allow you to be able to find a certain email at a later date if you need it.
- For a personal account, you can do as you wish. In my personal account pictured above, I was dealing with my Promotions tab, which is just a bunch of… promotions. Since almost all of the promotions had expired, there wasn’t anything worth reading or holding onto. So I chose to delete them all. All 2500+.🤷♀️
- You can also sort through the previous 10 or so emails from anyone important before you select all and take action.
- First, scroll through the first couple pages of emails and take note of any important senders.
- If you find a relevant sender, navigate to the search bar at the top of the window. On the far right side of the search bar, you’ll see a tiny little arrow. Click on it to expand a drop-down menu that has the option to search by name.
- From there, sort through the previous emails from that specific sender. If there’s anything worth saving, move it to the starred label on the left side of the screen.
- Once you’ve finished archiving important emails, go back to the first step of selecting all.
- After you select all, you have a few different options. You can move them to a processed label, you can archive them, or you can delete them. It’s completely up to you. Just be sure to take into account what type of email account you have (work, school, or personal).
– After deciding what you want to do, you will be asked to confirm the bulk-action.
Again, I chose to delete mine since they were promotions. But you will need to confirm the bulk-action for any type of action you take.

And that’s it! Within a couple of seconds, that specific tab within Gmail will go from having thousands of emails to ZERO!
From there, you will start to get a feel for what it’s like to successfully manage email. 🤩
(But to truly be able to manage email, there are 2 more important steps. Keep reading!)
Other Email Service Providers
For those that don’t use Gmail, I’ve got you covered.
Below are links for the most popular email service providers. Clicking on them will take you to an article that will help you bulk-select, no matter which service you use. And no matter how many unread emails you might have.

Step #3 – Follow an Email Processing Routine
If you are serious about learning how to manage email, then I suggest developing a routine for when you will read your emails.
By setting up an email routine, you will be in complete control of the decision-making process.
Think of it like this: Let’s say you receive an email notification while you’re at work. You instantly check your inbox but don’t have time to process the email completely. So it stays in your inbox until you can process it.
On the other hand, if you follow a routine and check your email at the same time each day, you’ll start to develop a habit. And that means you’ll be able to quickly take action on multiple emails because you’ll be less likely to get distracted!
– Start by determining the best time for YOU to check your emails.
Maybe you’re the type who checks their email before you even get out of bed.
Or maybe you like to read emails when you first get to work in the morning, or before you go to bed at night.
Just be sure to take into account your schedule and your habits.
– Then, decide on a routine that you will actually stick to.
Choose a specific time, say every evening after dinner. Or every morning while you eat breakfast.
You can certainly choose to read your emails more than once a day. Whatever works for you.
But if you only check your email whenever the mood strikes, it would be unrealistic to expect that you will start checking your email on a daily basis.
So start small! Aim to check your email a few times a week, and then work your way up to once a day.
– Use an alarm to remind you, if necessary.
If you want to get into the habit of processing your email on a consistent basis, use the alarm function on your phone to remind you.
On the other hand, you can also add ‘check email’ to your to-do list.
Step #4 – Use Labels and/or Folders
By now, you’ve tamed the incoming chaos, taken action on all of your old emails, and created a routine for when you will check email.
The final step to managing email is to learn how to properly process it as it arrives.
So what exactly should you do with each email as it arrives in your inbox?
For every email that you open, you should make a decision or categorize it right away.
The three basic categories are:
- Take Action
- Reference
- Delete
And the best way to do this is through labels or folders.
Gmail uses labels, which are located at the top of the window near the trash can icon.
And Outlook uses folders. When you click to expand the folder window, clicking on the plus sign will allow you to create a new folder.
Aside from the basic categories listed above, there are a few others that a typical family may want to use.
– Take Action
An action email is anything that involves more than one step.
Replying, paying a bill, talking with your spouse first, etc.
If it will take you more than 2 minutes to process, you should label it as “take action”.
But the caveat here is to actually set aside time to handle the email later. It doesn’t do you any good to move it to your “take action” folder if you’re only going to forget about it.
– Reference
I like to use the reference folder for anything that I may need to reference later. (Captain obvious, huh? 😜)
It’s kind of similar to saving an email in Outlook. But Gmail has a separate option to star an email, which is essentially marking it as important.
– Bills
The bills label can either be used to save payment confirmation numbers or bills that need to be paid in the coming month.
– Orders/Receipts
This label would mostly be used for online purchases. I use it for order and shipping confirmations while I’m waiting for the item to be delivered. I’ll also categorize important receipts that I might need to access later.
– Recipes
Ever since I started meal-planning, I get a crazy amount of recipes delivered to my inbox. When I receive a yummy-looking recipe, I’ll save it to my recipe folder. Every now and then, I glance through my recipe folder and choose a few to try.
– To Read
A “to read” folder is great to have for when you’re waiting in line or waiting for a meeting to start. Or even when you’re bored and your kids are hogging the TV.
– Home Info
I also have a label for home info since we are planning on selling our house in the future. Whenever we have maintenance or large renovations, I have a copy of the receipt emailed to me so I can save it under “home info”. Then when we get ready to put it on the market, I’ll have a complete list of all the recent work.
– The last 2 actions you might need to take for each email are “delete” and “unsubscribe”.
These are pretty self-explanatory.
Whenever you no longer need an email, simply click on the trash can, wherever it may be within your inbox.
And if there’s a certain email newsletter that you don’t want to receive anymore, you will find an option to unsubscribe at the very bottom.
Whenever you sit down for your email processing routine, make sure to categorize each email appropriately!
Don’t just leave an email sitting in your main inbox! Make a decision on it right away. You can either reply, delete it or move it to a specific folder so you can process it later.
Final Thoughts
Whew! We’ve covered a lot today! So let’s go over the basic steps one more time.
– Sign up for unroll.me so you can easily unsubscribe from any list you no longer want to receive.
Click here to sign up!
– Aim for Inbox Zero
If you’re swamped with thousands of emails, consider declaring email bankruptcy.
– Follow an email processing routine
- Avoid checking email every time you receive a notification
- Try to check email at the same time every day
– Make a decision on each email right away
- Reply
- Delete
- Take Action
- Reference
- Create more labels/folders if need be
Those are the 4 basic steps that will help you manage email! Keep in mind that it will take you a little while to get into the habit of processing your email on a consistent basis.
Once I declared email bankruptcy and started from scratch, it was a couple of weeks before I was able to get into the habit of checking my email on a daily basis.
But don’t let that stop you! Being able to finally manage email is a fantastic feeling! It’s definitely worth giving it a shot.
Do you have any tips for staying on top of the email chaos? Let me know in the comments!

Don’t forget to sign up for your free weekly planning bundle! 👇
Related posts:
How to Create an Effective Filing System
The Ultimate Guide: How to Organize Your Mail
20 Brilliant Family Command Centers
Stop Wondering How to Get Organized and Do This Instead


Leave a Reply
You must be logged in to post a comment.